This blog is no longer in use, please visit the updated website at: www.TheWoodlandElf.com


Thursday, September 15, 2011

My Own Piece of Land

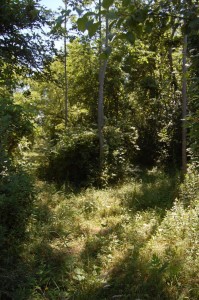
The entrance to my little paradise
At long last I have acquired my very own little piece of paradise (cue celebratory trumpets), which will soon be my new farm. If all goes well, I hope to begin construction on my straw bale dream house (about 700 or 800 sq. ft.) in 2013.

The lot is about 5 acres and has a sun-flecked wooded entrance (a must for a Woodland Elf), with the remainder being mostly open meadow. It’s even on the same road I’ve always lived on, just the other side of “Poppy and Gramma’s” farm. I’m stoked!

The plan is to live totally off the grid, producing my own food and electric and maintaining as close to a zero-waste policy as is humanly possible. There are already a few wild apples trees, (prime for autumn cider), some wild strawberries (which are still better than any domesticated varieties one can find), a slew of blackberry bushes, and even a few of my favorite nut trees. (At the moment there’s also an ever-flourishing crop of poison ivy, but I don’t plan to carry that into the future!).

Wednesday, September 14, 2011

Mirror Dangler

Ok, this project is sort of an embracing-your-inner-geek kind of thing, and is probably somewhere around a kindergarten level of skill, but I didn't have a lot of time so it was quick and fun.

Most people hang dreamcatchers or dice from the mirrors in their cars, but I wanted to try something a bit different. My car is named Serenity after Malcolm Reynold's spaceship Firefly, and the repeating line in the Firefly theme song is "You can't take the sky from me."

I enlisted the help of my sister who has a friend that spent a lot of time in China and knows how to write in Chinese (Chinese being one of the two languages used in Firefly). I asked her if she could translate you can't take the sky from me into Chinese characters. She couldn't find that exact phrase, but she gave me the characters for "You can't take my sky" which is I figured was close enough. While I'm using a Firefly quote, this project could be altered to use any quote in any language.

To begin, take a piece of cardstock big enough to accommodate your quote. Draw out the words in pencil (if you plan to have a quote on the backside as well, write it now. I wrote my car's name, Serenity, on the backside).

Next, trace the words (a few letters at a time) in glue and sprinkle glitter over them. Do the same to the backside if you wrote on it. Use the same color or a different color glitter to make outlines or underlines to spruce up the quotes.

When the glue has completely dried, bend the strip of cardstock into a circle and secure the ends with glue (if it won't stay shut, use a clothespin to hold it). Make sure the one you want on the outside is actually on the outside when you bend it.

Finally, punch a hole in each side of the circle, insert a sparkly string, and hang it from the mirror of your car. Nothing special, but a nice way to add a little personalization.



Thursday, September 8, 2011

Pumpkin Harvest!

Today was the first day of the pumpkin harvest! We had them turning orange earlier than usual this year due to the stress from lack of water. We also harvested some gourds today, so I will be bringing my little flowered "pumpkins" to market this week, as several people have been asking about them.

Saturday, September 3, 2011

Biodegradable Bags

I am thrilled to say that I finally get to go all natural with my soapmaking, no more plastic bag packaging. Today my order of 100% biodegradable bags arrived, so from now on, I will be packaging my soaps in those. They look like plastic, and they're clear like plastic, but the great part is, they're not plastic. They are in fact made from plants not petroleum. They definitely have a different feel. It's a bit stiffer than plastic, and the sound crinkles a bit differently, but they're completely biodegradable. It's always more fun when you can package a natural bar of soap in a natural package. Perfect!

Sunday, August 28, 2011

Fixing Squeaky Doors

Few things are more irritating and than the incesant cry of a squeaking door, especially when you're trying to sleep. You just about drift off and then someone opens the door or it's caught by the wind and SQUEAK! you're suddenly wide awake.

WD-40 is an often used remedy to fix squeaking doors, but my sister recently found a trick that works even better. The squeaky door remedy is as close as the kitchen cupboard: Pam. I'm sure any such cooking oil would fine, we just happen to have Pam in our cupboard, so that's what we used. And since it comes in a spray-can, it works great.

Just spray both sides of the hinges (taking care not to get the spray on the walls or the wood of the door) and let it go. It'll seep into the hinges and silence the squeaks. We've done it to almost every door in our house and they're so much quieter now. And as an added bonus, since Pam is used for cooking, we don't have to worry about it being poisonous, making it a bit more kid and pet friendly. If the cat licks the Pam off the door hinges, it is not going kill them or make them sick like WD-40 would.

Monday, August 22, 2011

Peaches

Well, it looks like our plan to beat the squirrels really did work. We are currently enjoying luscious, juicy peaches from our tree. The simple solution of plastic bags did the trick. We have more peaches this year than we've ever had. Nice when something so simple works so well!

Tuesday, August 16, 2011

Homemade, chemical-free shampoo

I decided to try a little a experiment this week after stumbling across an idea for homemade shampoo.

For the most part I use commercial shampoo that's on the organic/natural end of the spectrum with as few of the nasty shampoo toxins as possible (no SLS!). Even so, basically every commerically bought shampoo has a few unwanted chemicals, if only to preserve shelf life. I used to use the Beauty Without Cruelty shampoo, but Wegman's stopped carrying it for whatever reason, and there aren't many brands I like as well as that one, so I decided to try the all natural route this week.

I'd heard before that hair could be washed with baking soda, followed by a vinegar rinse, so I decided to give it a go. To make the baking soda shampoo mix a few spoonfuls of baking soda with a cup of water (if your hair is short, you can lessen the recipie). Make sure it's all stirred in well.

The hardest part to get used to is the fact that the mixture is so thin when you're used to using thick shampoos. The second thing is that is feels like you're washing your hair with sticky sand. That's where the vinegar rinse comes in. Mix two spoonfuls of vinegar with a cup of water (again if your hair is short, you may need less).

Like the baking soda, the vinegar rinse is thinner than any shampoo, but once you get used to that, it does get rid of the stickiness left behind by the baking soda.

This homemade shampoo works fine, but it does have one odd characteristic. The hair is clean, the hair looks clean, but the hair doesn't feel clean. It has a heavier weight due to the fact that the natural hair oils aren't being stripped away as they are with commercial shampoo. That means even though it is clean, and looks clean, it doesn't have that light, squeaky-clean feeling.

This may take some getting used to (or I may just decide to run back to my bottle of chemical shampoo.)

Wednesday, August 10, 2011

Dragonfly: March 1996-August 2011

Today was a very sad day. Due to her eye cancer, we had to put down my beloved cow Dragonfly (a.k.a. Drags, a.k.a Draggie Babes), who is pretty much the love of my life. I raised her up from a newborn baby and she's been my best friend for 15 years. To some people it's just a cow, but to me, she's an absolute family member, and that's what I feel like I've lost.

Dragonfly always loved her special treats, whether it was apples, rotten tomatoes, corn husks, or pumpkins. She loved being brushed, especially under the neck. And she had a trademark misshapen right ear from where her brother had once taken a bite out of it to see if it was tasty.

In honor of my darling, I put together a little slideshow of some of my favorites images of my Draggie Babes. I originally had it set to Joe Cocker's "You Are So Beautiful," but the music didn't carry over when I posted it. I guess it doesn't really matter, because she'll always be beautiful to me. Even the vet, who probably sees a hundred cows a day, once remarked what a pretty cow she was. So this is for you Drags, you are so beautiful to me. I love you.

Thursday, August 4, 2011

Dried Flower Teapot

I made this little teapot flowerpot as a special request for someone at the farm market. She gave me the teapot and asked me if I could do some kind of dried flower arrangement in it.

To make this project you will need:
An empty teapot
Floral foam
Dried flowers (I used two kinds statis, strawflowers, coxcomb and goldenrod, but dried yarrow would also be a nice addition if you have any)
A piece of brightly colored ribbon
Hot glue gun and glue sticks

Begin by putting the floral foam in the bottom of the pot (I glued my foam to the bottom of the pot so it wouldn't move around). Start by sticking a spring of goldenrod right in the center. This will be the base that everything else gets worked around.

Continue adding statis, strawflowers, and coxcomb to all sides of the goldenrod, sticking them firmly into the floral foam. Make sure the goldenrod remains taller than the rest of the arrangement. Keep adding flowers until the entire teapot is filled, then add a 3 or 4 springs of whispy, white statis (it looks similar to dried baby's breath), so that the stems stick of out of arrangement.

Take a thick piece of statis and coat the stem in hot glue. Slide it into the spout and hold it for a moment so the glue secures it to the inside of the teapot spout. Lastly, form a nice bow out of the ribbon and hot glue it onto the handle of the teapot.