Real feathers can be used to make beautiful and unique jewelry.

Friday, December 30, 2011
Friday, December 23, 2011
Friday, December 16, 2011
How to Make Gourds into Snowmen
A little paint and some black felt is all that's necessary to transform a dried birdhouse gourd into a charming holiday snowman.
Friday, December 9, 2011
How to Make Christmas Tree Ornaments out of Scrapbooking Paper
These ornanments are based on Victorian style Christmas ornaments, but require little more than paper.
Monday, December 5, 2011
Elf-Esteem
Well, after writing a bunch of how-to craft articles, someone suggested I try crafting how-to videos, so starting I'm starting a little how-to video series called Elf-esteem. The name comes from the fact that creating things often raises self-esteem, and as my nickname is "The Elf," Elf-esteem seemed an appropriate name. I'll be posting a new video hopefully each week on youtube. First ones launches on the 9th of the December.


And while I was in updating mode, I finally got myself a page on Facebook. So by all means, "Like" my page and Raise Your Elf-esteem.
Wednesday, November 30, 2011
Gourd Birdhouses
Gourd Birdhouses
A dried gourd can make a cozy house for some lucky bird and it can make an attractive decoration for a yard as well.
You will need:
Dried gourds
A dremel, drill, or jackknife
Paint
Acrylic sealer
Eyehooks
The best type of gourd to use as a birdhouse is actually called a birdhouse gourd. They dry easily, have a sturdy shell, and are roomy enough for a bird to enjoy. That said, one need not limit themselves only to birdhouse gourds. A gourd birdhouse is as much decorative as it is functional and there are many gourds that lend themselves well to this project. Goosenecks, apple gourds, caveman's club, and others all work well as birdhouses. You should select one that meets your fancy.
First, you will need a gourd. If you have one dried from last year, it makes the task easier. Gourds are best dried by letting them get hit with the frost for several cool nights, just be sure not to let them get too wet. They can also be dried indoors, but require a very dry area. Birdhouses can also be made from fresh gourds, but will sometimes become distorted as they dry.
To begin, scrape off the gourd's flaking outer skin. Using the dremel, drill, or jackknife, cut a hole about an inch and a half in diameter in the lower half of the gourd. Pull out the "guts" through this hole. In a dried gourd, guts have usually hardened and may have to be broken into small pieces to come out through the hole. Be careful not to break the hole when pulling out the guts.
When the inside of the gourd is empty, paint the outside with any design you choose. Using the hole as the center of a flower is always fun. After the paint has dried, spray it with a clear acrylic sealer to make it weatherproof.
Turn the gourd upside-down and drill 3 holes in the bottom. This will allow for drainage should any rain come in the hole. Carefully screw an eyehook into the top of the gourd somewhere near the stem. This is usually where the gourd’s shell is thickest and allows for the strongest hold.
Loop a piece of string through the eyehook, hang the gourd from a tree branch and wait for the birds to move in come spring. It’s good to have the houses out several months before spring. Birds don’t actually claim a house until spring, but they’re searching for good nesting sights well before.
Wednesday, November 23, 2011
Mini Pies
When you take a brown bag lunch to work multiple days a week, you're bound to eventually come up with some creative, frightening, and even desperate concoctions. This is one of the more edible ones that I came up it. It makes a nice after lunch dessert, and sort of breaks up the monotony.
Ingredients:
Rolled Piecrust
Fruit for pie filling
Honey
Oatmeal
Brown sugar (optional)
It is easiest to make several of these pies at the same time. Start with a rolled piecrust. They’re usually found in the freezer section and are very flexible. Cut the piecrust into 4×6 inch strips. Take your fruit of choice; apples, strawberries, pears, and blueberries all make great mini pie fillings. Chop or mash the fruit, then test the tartness. If the fruit is too tart, add a little brown sugar to sweeten it.
Spread the mashed fruit onto the pie filling. Carefully wrap the edges of the piecrust over the filling, completely encasing it. Pinch the edges to keep them in place.
Using a basting brush, spread honey on all sides of the mini pie. Then roll the honey-coated crust in the oatmeal. It will give a pleasant crunch to the finished pie.
Stick the pie in the oven and bake for 12-15 minutes at 350 degrees. The piecrust should be a nice golden brown when it is done. The fruit inside will have melted down a bit, forming an almost jam-like interior. These pies are best fresh, but will last for several days, and no refrigeration is needed.
Thursday, November 17, 2011
Clamshell Tealights
These little candles will burn brightly for 10-20 minutes.
You will need:
Empty clamshells halves
Beeswax or another type of wax
Double boiler or two pans
Wicking
Newspaper
To begin, cover your work area with newspapers, as this is a messy craft. Soak the clamshells in warm water, then vigorously scrub them out to remove any clam residue. When the shells have dried, place them on a flat surface to see how well they set. Most of them will lean forward a bit, but try to use the flattest shells as they will hold more wax.
I always use beeswax for these candles as it is the longest burning and it is easy to wick once it begins to cool. However, other waxes can be substituted for beeswax.
Melt beeswax in a double boiler. If you don’t have a double boiler, this can be easily done by placing a pan of water beneath the pan with the wax. Melting wax this way is a safety method, as it keeps the heat from directly hitting the wax. Beeswax is highly flammable so do not leave it unattended even for a minute. If it begins to smoke, remove the pan from the heat immediately.
It is best to melt the wax on a low temperature. It may take a bit longer, but it also reduces the risk of wax fires. Do not cover the wax when melting it, but keep a lid handy in case the wax does catch fire. The lid can be used to quickly smother the flames.
Once the wax has completely melted, remove it from the burner and let it cool for 1.5 minutes. If you wish to add color, now is the time to do so. You can also add scent after the color, but it is usually not necessary with beeswax as it bears a natural honey scent.
Measure a length of wicking 1 inch for each shell candle you have. i.e. 12 candles is a 12 inch wick. Dip the wick into the wax, completely covering it, then set aside and let it cool.
Fill each clamshell to the brim with beeswax, taking care not to overflow it. While the beeswax is cooling, cut the wax covered wicking into 1 inch sections.
When beeswax cools, the bottom and the sides are the first to harden. Watch the shells carefully and when the wax at the edges has hardened about 2 millimeters from the edge, place a piece of one-inch wick into the liquid center. Let go and the wick should stand on its own. Repeat with the remaining shell candles.
After 4 hours, the candles should be cooled completely. At that point, they can be lit or saved for another special occasion.
Saturday, November 12, 2011
Upcoming Shows
I will be at the Canandaigua PTSA Holiday show on November 19th. I'll have a few new kinds of soap that I didn't have at the market over the summer, as well as some holiday oriented crafts.


Also stop by the Cheshire Union open house November 18-21st.

Saturday, November 5, 2011
Broom Ladies
These cute little brooms are functional as well as decorative. Made of broomcorn, they are excellent as hand brooms.
You will need:
Broomcorn (also called ornamental grass/sorghum)
Material for dress, face, and hands
Cotton
Yarn
Markers
Raffia
Needle and thread
Glue
Before the invention of nylon brooms, broomcorn was (and often still is) used to make corn brooms. It is not actually a type of corn, but in fact a very large grass. The nickname of broomcorn was derived from the fact that the grass stems are so large they closely resemble cornstalks.
Begin by shucking the seeds from the broomcorn heads (if your broom will be merely decorative, the seeds can be left on for the colorful effect) Tie several of the shucked broomcorn stalks together with raffia just above the heads, and again about an inch from the broom’s top. Form a raffia loop, and attach this to the top tie.
Cut 2 identical dress shapes from material and sew them together. Make sure the neck hole is large enough to fit over the broom handle. Cut a head and a pair of hands from material. Stuff them with cotton. Sew the head to the front half of the dress. Sew the hands to the sleeves of the dress.
Slip the dress over the top of the broom handle, sliding it down until the skirt part of the dress covers the heads of the broomcorn. Leave about an inch and a half of the broomcorn peeking out beneath the dress. Using the markers, draw a face on the broom lady. Cut a few pieces of yarn and glue them to the top of the head as hair. Embellish the broom ladies with miniature baskets or tiny brooms of their own glued to their hands.
Saturday, October 29, 2011
Toll Painted Glassware
Toll painting glassware is an inexpensive way to create festive serving glasses for autumn parties. After the party, the paint easily washes off with a little soap and hot water.
You will need:
Toll paint (acrylic paint)
Paintbrushes
Scratch paper
Glassware to be painted
When choosing your toll paint, be sure it is not the kind made specifically for glass, as this type of paint is permanent and will not wash off the glassware after the party. Avoid anything that says “Patio Paint” as it is usually permanent. The best paint to use for this project is just the generic acrylic paint available in craft stores.
To make autumn leaves, load a flat-tipped paintbrush with red on one half and orange on the other (you can also substitute yellow for one of the colors). Run a short stroke down the scratch paper, squiggling the brush from side to side to blend the colors a bit.
With the red half of the brush facing out, paint several small maple leaf shapes on the glassware. Use a quick stroke through the center of the leaves to fill in any open spaces. Pumpkins, jack-o-lanterns, spiders and webs make equally appropriate glass decorations for autumn parties.
Once the glassware is painted, leave it to dry for several hours before using. After use, simply soak them in a sink full of hot, soapy water, and the paint will easily rub off with a dishtowel.
This project need not be saved only for autumn. It can easily be adjusted for any time of the year. Snowflakes, snowmen, and evergreen trees work well for Christmas. Shamrocks for St. Patrick’s Day. Hearts for Valentines Day. Flowers for Midsummer’s Eve. Almost any time of year presents suitable symbols.

Saturday, October 22, 2011
Simple Pleasures Project, Day 130
Hiding in the woods with my brother so we can jump out and scare people coming to the Halloween party.
Simple Pleasures Project
Simple Pleasures Project
Sunday, October 16, 2011
Fracking: Short-Term Benefits, Long-Term Catastrophe
With the current possibility of New York State being opened to fracking, the debate about whether the benefits outweigh the risks is a hot topic. There are extremes on both sides, with some people claiming that there are no benefits to fracking, and others claiming there are no adverse effects from fracking. The truth is, fracking has both benefits and detriments. The problem is that, while the benefits are certainly instant gratification, the long-term impacts are often catastrophic.
First and foremost, the greatest benefit of fracking is that it will immediately provide jobs. What is often overlooked, however, is how many jobs it will undoubtedly destroy in the long run. Fracking consumes huge amounts of drinking water and uses toxic chemicals. When spills occur (which is inevitable in any man-made operation), those toxic chemicals are released into the environment, right into the path of drinking water sources. Aside from the hazardous chemicals used in the process, fracking also releases naturally occurring deposits of dangerous substances, including radioactive materials, found in high levels in the Marcellus Shale where the NY fracking would take place. There will be many sites flunking their radon tests if fracking is allowed in New York.
Such chemicals have ended up in the water sources at hundreds of places in Pennsylvania, New Mexico and Colorado, which has suffered over three-hundred spills of chemically contaminated fracking waste water. In Pavilion, Wyoming, the EPA found high levels of cancer-causing substances that are often used in fracking, in the water supply of over forty homes. Residents in this city have also contracted a number of neurological ailments from exposure to these chemicals. The residents of this city had fresh clean water until the fracking began, at which point their water began to turn black as well as smelling and tasting like gas.
Perhaps the most alarming fact is that fracking is exempt from the Clean Water Act of 2005. Fracking companies are exempt from disclosing what toxic chemicals they use in the process. In short, they can pump what whatever toxins they want into the drinking water, reap the profits from the gas produced, and be long gone while the residents are left to deal with the aftereffects.
Due to these ecological impacts, people who will be adversely affected include, but are not limited to, farmers whose livelihood depends greatly upon water availability. Waiters, cooks, and others in the restaurant industry when tourism rates fall due to polluted water sources. Hotels workers for the same reason. People involved in real estate will be affected, as banks know the impacts of fracking and are reluctant to loan to those in the vicinity of fracking wells. Not to mention the fact that property values plummet in the wake of fracking fallout due to contamination.
Gas is not a gift that keeps on giving. With our current rate of consumption, it is something that will inevitably run out. Therefore it is ludicrous to destroy so many lives for a few extra years worth of what is ultimately a finite resource. The ones who profit are the ones who will be least affected by the aftermath of fracking; the gas companies. The rest of us pay for the gas companies' greed.
People often tout fracking as a way of gaining energy independence. This is a misleading claim, however. Fracking produces natural gas, a liquid that is used largely for home heating. America’s larger energy consumption, however, is petroleum. This oil is used in everything from cosmetics to plastics to medications and of course is the gasoline that fuels American automobiles. In fact America consumes more oil than any other country in the world. The oil for this country’s guzzling appetite is fueled largely by other countries such as the Middle East which hold the largest deposits of oil. No amount of fracking will change that, and therefore will never lead to energy independence.
The natural gas produced by fracking is claimed by supporters to be a “cleaner” energy source, and while it is cleaner than oil (most of which doesn’t come from this country anyway), it actually leaks more emissions than coal. Robert Howarth, a professor at Cornell University conducted a study on the emissions produced by natural gas and found that "Compared to coal, the footprint of shale gas is at least 20 percent greater and perhaps more than twice as great on the 20-year horizon and is comparable when compared over 100 years."
Additionally, hydrofracking has been found to cause earthquakes, just one more way fracking will harm people and their properties. Cuadrilla Resources, a British hydrofracking company actually admitted that their fracking well did cause multiple, minor earthquakes. Unlike seismic events on the west coast, where the damage is generally more localized, quakes on the east coast are often felt throughout an area ten times larger than the west coast, due to the fact that the east coast ground is colder and more intact. East coast quakes are often felt throughout several states, making the damage area more widespread. Also the locations of many fault lines on the east coast are unknown, making it all the more difficult for fracking companies to avoid. Just one more reason to keep fracking out of New York.
In the end, I think there’s one phrase that sums up the situation. Don’t frack with my water supply! Don’t frack with New York!
Sources:
The DEC
The EPA
National Geographic Magazine
Cornell University
60 minutes
Naturalgas.org
The American Petroleum Institute
The US Energy Information Administration
National Geographic Magazine
Cornell University
60 minutes
Naturalgas.org
The American Petroleum Institute
The US Energy Information Administration
The Daily Messenger Newspaper
Pennsylvania Newspapers
Monday, October 10, 2011
Bittersweet and Broomcorn Wreath
I've made a lot of broomcorn wreaths over the years, usually using a metal coathanger or the premade 12 and 18 inch metal hoops. This week, however, I had a request for a larger wreath, which I knew would be the perfect time to experiment with adding bittersweet to the broomcorn.
To begin, you will need a 24 inch grapevine wreath to use as the base. Cover it with broomcorn, using 22 gauge wire to secure the broomcorn to the grapevine base. Normally I go around the edges with brown thread (which is pretty much invisible against broomcorn) to keep the broomcorn tight, but since this wreath was so big, I thought it looked better with the edges loose, so I left them alone.
Tie a large, two loop bow from some autumn wire-edged ribbon. I found that plaid looked very nice. Secure it to the wreath with wreath wire.
Make four bunches of bittersweet stalks, each piece being about 4-6 inches in length. Fasten them to the wreath with wire putting two bunches at the top near the bow, and two bunches toward the bottom, but leaving several inches of space in the middle between them.
Make three bunch of dried roses (yellow or red work best as they're autumn colors). Use wreath wire to fasten the rose bunches on the wreath, in between the bittersweet bunches.
Hang this wreath on an indoor wall or outside under an eave.

Tuesday, October 4, 2011
Halloween Spider Soaps
My aunt had a cute idea of putting bugs into soap bars for Halloween, so today I went ahead and tried it. It's a very simple project, and can be done using transparent melt and pour glycerin. You'll also need some plastic spiders which can be found pretty much anywhere this time of the year. Black is traditional, but other colors look great too.
Start by pouring a layer of glycerin into a brownie pan. Quickly set the spiders in the glycerin layer, making sure their legs poke down into the glycerin. When the first layer of glycerin has hardened, pour a second layer over it, covering the spiders. You can also allow a bit of the spider to stick out the top for texture.
Cut the soap into bars allowing one spider for each bar. Put the bars in a soap dish and warn arachnophobics to be ware!
 |
| No spiders were harmed in the making of these soaps. |
Wednesday, September 28, 2011
100% Recycled Paper
I've been using cardstock that was 30% post consumer waste for several years now, but I've always been searching to better that percentage. Well, I've finally what I've been questing for, cardstock made of 100% recycled paper, 100% post consumer waste. Even the factory it's made in is power with sustainable, eco-friendly windpower. So I am thrilled to announce that from this day forth, my greeting cards (and envelopes of course) will be made with 100% recycled paper.
Thursday, September 22, 2011
Simple Pleasures Project, Day 100
Well, I've hit day 100 of the Simple Pleasures Project and I'm loving it.
Today's simple pleasure was making cards, something I really love and so fortunately get to do quite a lot of thanks to the farm market.
Today's simple pleasure was making cards, something I really love and so fortunately get to do quite a lot of thanks to the farm market.
Thursday, September 15, 2011
My Own Piece of Land
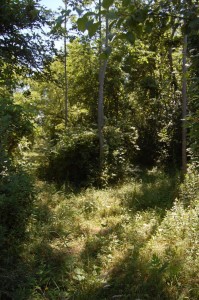 |
The entrance to my little paradise
|
The lot is about 5 acres and has a sun-flecked wooded entrance (a must for a Woodland Elf), with the remainder being mostly open meadow. It’s even on the same road I’ve always lived on, just the other side of “Poppy and Gramma’s” farm. I’m stoked!
The plan is to live totally off the grid, producing my own food and electric and maintaining as close to a zero-waste policy as is humanly possible. There are already a few wild apples trees, (prime for autumn cider), some wild strawberries (which are still better than any domesticated varieties one can find), a slew of blackberry bushes, and even a few of my favorite nut trees. (At the moment there’s also an ever-flourishing crop of poison ivy, but I don’t plan to carry that into the future!).
Wednesday, September 14, 2011
Mirror Dangler
Ok, this project is sort of an embracing-your-inner-geek kind of thing, and is probably somewhere around a kindergarten level of skill, but I didn't have a lot of time so it was quick and fun.
Most people hang dreamcatchers or dice from the mirrors in their cars, but I wanted to try something a bit different. My car is named Serenity after Malcolm Reynold's spaceship Firefly, and the repeating line in the Firefly theme song is "You can't take the sky from me."
I enlisted the help of my sister who has a friend that spent a lot of time in China and knows how to write in Chinese (Chinese being one of the two languages used in Firefly). I asked her if she could translate you can't take the sky from me into Chinese characters. She couldn't find that exact phrase, but she gave me the characters for "You can't take my sky" which is I figured was close enough. While I'm using a Firefly quote, this project could be altered to use any quote in any language.
To begin, take a piece of cardstock big enough to accommodate your quote. Draw out the words in pencil (if you plan to have a quote on the backside as well, write it now. I wrote my car's name, Serenity, on the backside).
Next, trace the words (a few letters at a time) in glue and sprinkle glitter over them. Do the same to the backside if you wrote on it. Use the same color or a different color glitter to make outlines or underlines to spruce up the quotes.
When the glue has completely dried, bend the strip of cardstock into a circle and secure the ends with glue (if it won't stay shut, use a clothespin to hold it). Make sure the one you want on the outside is actually on the outside when you bend it.
Finally, punch a hole in each side of the circle, insert a sparkly string, and hang it from the mirror of your car. Nothing special, but a nice way to add a little personalization.


Thursday, September 8, 2011
Pumpkin Harvest!
Today was the first day of the pumpkin harvest! We had them turning orange earlier than usual this year due to the stress from lack of water. We also harvested some gourds today, so I will be bringing my little flowered "pumpkins" to market this week, as several people have been asking about them.
Saturday, September 3, 2011
Biodegradable Bags
I am thrilled to say that I finally get to go all natural with my soapmaking, no more plastic bag packaging. Today my order of 100% biodegradable bags arrived, so from now on, I will be packaging my soaps in those. They look like plastic, and they're clear like plastic, but the great part is, they're not plastic. They are in fact made from plants not petroleum. They definitely have a different feel. It's a bit stiffer than plastic, and the sound crinkles a bit differently, but they're completely biodegradable. It's always more fun when you can package a natural bar of soap in a natural package. Perfect!
Sunday, August 28, 2011
Fixing Squeaky Doors
Few things are more irritating and than the incesant cry of a squeaking door, especially when you're trying to sleep. You just about drift off and then someone opens the door or it's caught by the wind and SQUEAK! you're suddenly wide awake.
WD-40 is an often used remedy to fix squeaking doors, but my sister recently found a trick that works even better. The squeaky door remedy is as close as the kitchen cupboard: Pam. I'm sure any such cooking oil would fine, we just happen to have Pam in our cupboard, so that's what we used. And since it comes in a spray-can, it works great.
Just spray both sides of the hinges (taking care not to get the spray on the walls or the wood of the door) and let it go. It'll seep into the hinges and silence the squeaks. We've done it to almost every door in our house and they're so much quieter now. And as an added bonus, since Pam is used for cooking, we don't have to worry about it being poisonous, making it a bit more kid and pet friendly. If the cat licks the Pam off the door hinges, it is not going kill them or make them sick like WD-40 would.
Monday, August 22, 2011
Peaches
Well, it looks like our plan to beat the squirrels really did work. We are currently enjoying luscious, juicy peaches from our tree. The simple solution of plastic bags did the trick. We have more peaches this year than we've ever had. Nice when something so simple works so well!
Tuesday, August 16, 2011
Homemade, chemical-free shampoo
I decided to try a little a experiment this week after stumbling across an idea for homemade shampoo.
For the most part I use commercial shampoo that's on the organic/natural end of the spectrum with as few of the nasty shampoo toxins as possible (no SLS!). Even so, basically every commerically bought shampoo has a few unwanted chemicals, if only to preserve shelf life. I used to use the Beauty Without Cruelty shampoo, but Wegman's stopped carrying it for whatever reason, and there aren't many brands I like as well as that one, so I decided to try the all natural route this week.
I'd heard before that hair could be washed with baking soda, followed by a vinegar rinse, so I decided to give it a go. To make the baking soda shampoo mix a few spoonfuls of baking soda with a cup of water (if your hair is short, you can lessen the recipie). Make sure it's all stirred in well.
The hardest part to get used to is the fact that the mixture is so thin when you're used to using thick shampoos. The second thing is that is feels like you're washing your hair with sticky sand. That's where the vinegar rinse comes in. Mix two spoonfuls of vinegar with a cup of water (again if your hair is short, you may need less).
Like the baking soda, the vinegar rinse is thinner than any shampoo, but once you get used to that, it does get rid of the stickiness left behind by the baking soda.
This homemade shampoo works fine, but it does have one odd characteristic. The hair is clean, the hair looks clean, but the hair doesn't feel clean. It has a heavier weight due to the fact that the natural hair oils aren't being stripped away as they are with commercial shampoo. That means even though it is clean, and looks clean, it doesn't have that light, squeaky-clean feeling.
This may take some getting used to (or I may just decide to run back to my bottle of chemical shampoo.)
Wednesday, August 10, 2011
Dragonfly: March 1996-August 2011
Today was a very sad day. Due to her eye cancer, we had to put down my beloved cow Dragonfly (a.k.a. Drags, a.k.a Draggie Babes), who is pretty much the love of my life. I raised her up from a newborn baby and she's been my best friend for 15 years. To some people it's just a cow, but to me, she's an absolute family member, and that's what I feel like I've lost.
Dragonfly always loved her special treats, whether it was apples, rotten tomatoes, corn husks, or pumpkins. She loved being brushed, especially under the neck. And she had a trademark misshapen right ear from where her brother had once taken a bite out of it to see if it was tasty.
In honor of my darling, I put together a little slideshow of some of my favorites images of my Draggie Babes. I originally had it set to Joe Cocker's "You Are So Beautiful," but the music didn't carry over when I posted it. I guess it doesn't really matter, because she'll always be beautiful to me. Even the vet, who probably sees a hundred cows a day, once remarked what a pretty cow she was. So this is for you Drags, you are so beautiful to me. I love you.
Thursday, August 4, 2011
Dried Flower Teapot
I made this little teapot flowerpot as a special request for someone at the farm market. She gave me the teapot and asked me if I could do some kind of dried flower arrangement in it.
To make this project you will need:
An empty teapot
Floral foam
Dried flowers (I used two kinds statis, strawflowers, coxcomb and goldenrod, but dried yarrow would also be a nice addition if you have any)
A piece of brightly colored ribbon
Hot glue gun and glue sticks
Begin by putting the floral foam in the bottom of the pot (I glued my foam to the bottom of the pot so it wouldn't move around). Start by sticking a spring of goldenrod right in the center. This will be the base that everything else gets worked around.
Continue adding statis, strawflowers, and coxcomb to all sides of the goldenrod, sticking them firmly into the floral foam. Make sure the goldenrod remains taller than the rest of the arrangement. Keep adding flowers until the entire teapot is filled, then add a 3 or 4 springs of whispy, white statis (it looks similar to dried baby's breath), so that the stems stick of out of arrangement.
Take a thick piece of statis and coat the stem in hot glue. Slide it into the spout and hold it for a moment so the glue secures it to the inside of the teapot spout. Lastly, form a nice bow out of the ribbon and hot glue it onto the handle of the teapot.

Saturday, July 30, 2011
Market Day

Friday, July 29, 2011
The Stand is Open!
Ok, the corn is finally ripe so the stand is now officially open. As it's so dry (the pumpkins are actually turning orange already because they're so stressed from lack of water) and since everything is so late because it's so dry, we're only stocking the stand Friday, Saturday, and Sunday this year. And as always, it's usually not stocked much before 11:00 AM, but after that it's open till dark. Enjoy!
Saturday, July 23, 2011
Olive Oil Soap
Well, I'm getting closer. This was my second try at a batch if oilve oil soap, and while it didn't exactly work out, I think I'm getting closer. I used a bar of olive oil soap once and it was one of the nicest I've ever used, and recently several people at the market have asked me if I do oilve oil soap. So, I've been working on trying to make some. I have a recipe, but I think I'm going to have to alter it. I can't seem to get it to trace following the recipe, so I'll think I'll change the recipe before I wreck another batch.
The difficult part is that I'm used to using lard in the soapmaking, whereas the olive oil recipe is a castile (no animal products). That and I use my own homemade lye, so it's a bit more unpredictable than storebought. I think I'm going to get myself some palm oil to add to the olive oil, that might help a bit. (And I only use certified, sustainably grown palm oil). A batch or two more, and I just might have some bars to take to market.
The difficult part is that I'm used to using lard in the soapmaking, whereas the olive oil recipe is a castile (no animal products). That and I use my own homemade lye, so it's a bit more unpredictable than storebought. I think I'm going to get myself some palm oil to add to the olive oil, that might help a bit. (And I only use certified, sustainably grown palm oil). A batch or two more, and I just might have some bars to take to market.
Saturday, July 16, 2011
Downtown Art Show
It was the street arts festival in Canandaigua today, so after the market I parked my car (under the pavillion where I already was because I knew there wouldn't be another parking space for miles), and headed out to the sidewalks. I try to hit it every year. There're always some old favorites, as well as some new ones. I really liked the woman making shampoo bars. It was so interesting, I might have to try it myself. I already know how to make soap from scratch, so I can't imagine shampoo bars would be that different, just a change in a few ingredients.
I collected a lot of cards, I always do at this thing. Some are for inspiration, and some are for people I might want to look up later. And as always, I stopped by the tie-dye guy and the batik woman. I do a little tiedying and batiking myself, but it's time-consuming, so it's always nice to walk into a tent and see walls of it.
Of course the highlight of the sidewalk trip: Fried Dough!
Monday, July 11, 2011
Squirrel Deterrent
It happens every year, the nuts on Gramma's trees and the fruit in our are little orchard are growing beautifully. They get just about ripe, and suddenly BAM! they're gone. Where have they gone, they're taken by the squirrels of course. Between ourselves and Gramma, we've tried almost every deterring technique known to man, save one: Plastic Bags. Believe it or not, this simple solution works better than all the rest.
Just tie a few plastic bags to the trees with fruit or nut and allow them to blow in the wind. The presence of the bags (and probably the noise as well) does wonders to keep the squirrels away, which means we'll actually be able to enjoy the fruit of the trees we worked so hard to take care of. And so as not to deprive the squirrels of everything, we have a bunch of butternut and walnut trees in our yard that they're welcome to.
Just tie a few plastic bags to the trees with fruit or nut and allow them to blow in the wind. The presence of the bags (and probably the noise as well) does wonders to keep the squirrels away, which means we'll actually be able to enjoy the fruit of the trees we worked so hard to take care of. And so as not to deprive the squirrels of everything, we have a bunch of butternut and walnut trees in our yard that they're welcome to.
Thursday, July 7, 2011
Simple Pleasures Project, Day 23
Well, I'm 23 days into The Simple Pleasures Project, and I'm loving it. It's amazing the way it really makes one realize just how many of the little things we take for granted. Fortunately, I now have the time to notice and enjoy those little things, things like sharing a hug with my best friend.
 |
| Dragonfly (the cow) and me. |
Sunday, June 26, 2011
Making a Fairy Part 2: The Dress
For the fairy dress, I had a fair bit of white satin leftover from a wedding gown I'd done last year, so I made the fairy dress out of that. I double-layered it on the body part of the dress so it wouldn't be see through, and fortunately satin is still light enough to wear to a summer Ren Fest.
For the gold trim on the pointed sleeves and the collar I found a polyester fabric that worked great. The dress has a zippered back. The costume was finished off with a pair of pointed ears, like the elf's. Glittery makeup, a flute, and a greenery wreath for the head also make excellent fairy embellishments.

For the gold trim on the pointed sleeves and the collar I found a polyester fabric that worked great. The dress has a zippered back. The costume was finished off with a pair of pointed ears, like the elf's. Glittery makeup, a flute, and a greenery wreath for the head also make excellent fairy embellishments.

Wednesday, June 22, 2011
My Top 3 Cures for Insomnia
I'm a person who never watches television. I like a good movie on Saturday night or while I'm stripping flowers for the market, but as far as actual television, forget it. When you live out in the boonies with 3 channels, your choices are basically reality shows, medical, cop, or lawyer; none of which appeal. So basically I never watched TV...at least until I found out it could cure insomnia.
I've always been a nightowl. Even as a two-year-old I knew what "Here's Johnny" meant. My body is just naturally geared toward the evening and my energy level kicks into gear in the late afternoon. Unfortunately most of the normal world is geared toward the day, so needless to say, I've had problems with insomnia for years.
I've tried every trick in the book; leaving the lights low for an hour before bed, taking a bath before bed, playing music, drinking milk, socks on, socks off, leaving the window open, Chinese herbs, you name it. So a couple years ago, I decided to try watching a little bit of a movie before bed to see if it would relax me so I could go to sleep. Granted anything I had ever read advised against that very thing, saying instead that a person should turn off electronic lights, televisions and computers an hour before bed to regulate the sleep hormones. But in my case, been there, done that and it hadn't worked, so I decided to give the movie idea a try.
The hitch was, trying to follow a movie when you only watch a few minutes a night really isn't that great. However, around the time I'd decided to try a movie before bed, I stumbled across a fantasy show that actually looked like something I might be into called "Legend of the Seeker" on hulu. It was perfect.
Unlike a movie, a television episode is shorter, designed to have break points in it for commercials. I found I could watch 10 minutes of an episode each night on hulu (basically through a commercial break each night), and make a single episode last almost a whole week. Since it's online, I can just pick up right where I left off the previous night and I sleep great. I'm still a night owl going to bed around 2am, but I'm no longer lying in bed until the sun rises due to insomnia.
For me that simple little ten minutes of an episode each night relaxes me and allows me to easily fall asleep. I'm able to just leave all the baggage of the day behind, turn off my own life for ten minutes and become immersed in someone else's world. And after that, I'm able to sleep.
One thing I noticed, however, is that whatever the pre-bedtime 10 minutes are, they can't be comedy. It can be a serious show with comedy in it, but it can't be full out comedy or I end up just watching it, instead getting lost in it. The getting lost is the key, I think comedy is too light to draw a person in. You have to able to get lost in another world and leave yours behind in order to fall asleep. (And if you like to be kept guessing, stretching a 1-hour show out over an entire week really increases the suspense factor!)
So here are my top three insomnia cures. Unfortunately the type of shows I'm attracted to usually don't last more that a season or two. They're often more like an extended movie than a TV series, being plot heavy, and usually not the type of show that a person can just drop into the middle of, which is probably why they work so well for my insomnia. They're so easy to get lost in. In any event, these are three that work well for me:
#1: Legend of the Seeker
I guess the first love really is the best. I actually found this show because I saw a picture that looked like Lord of the Rings type fantasy (actually that single picture inspired an entire novel I've been working on). This show has it all, swords, adventure, magic, great costumes, and humor mixed into the drama. Sadly, Legend of the Seeker was not renewed for a season three (at least not yet, the Save Our Seeker campaign is currently fighting for exactly that). I never had to worry about trouble sleeping if I watched 10 minutes of this before bed and I loved it so much that I ended up watching both seasons several times (in ten minute segments of course)
#2: Firefly
This show I found because it was similar to something I was writing at the time. I love almost anything that falls into the Western genre, and had in fact at the time been writing a filmscript for a western. The problem was, I knew that I could never film the movie anywhere near my home because I don't live in the west, so I'd come up with the idea of doing it as a cowboy movie in space on some distant planet that was like the wild west. That was about the time I learned about Firefly. I'd heard of this show a few times, but as far as I knew, it was just another space show, so I wasn't interested in it until I learned it was actually a space western. When I heard that, I knew I had to watch it because I was writing something similar. Firefly was beautifully done. The western element was very prominent, it had a strong plot, and a few ongoing subplots, as well a bit of humor mixed in. Unfortunately this show only lasted one season, but there was a continuation a few years later in the form a movie after the fan kicked up ruckus about the show's cancellation.
#3: Roar
This was the shortest lived show on my list, not even lasting an entire season, but it certainly was good while it lasted. I found this one while I was doing research for a Celtic warrior costume. I had a picture in my head of what I wanted it to look like, and then I saw a picture of one of this show's characters wearing something similar to the picture in my head, so I decided to look it up. I've always had this interest in the Celts (some of my ancestors were Celts, so maybe that's where it comes from), so this show instantly resonated with me. Roar involved the last of the Celtic tribes fighting off the invasion of the Romans 400 years after the death of Christ. A subplot throughout the show involved one of the main villains who was cursed to live forever because he had been the one to kill Christ. Roar didn't have as much of a central plot as Legend of the Seeker and Firefly, and sometimes had trouble following its own story line (they've yet to explain how Molly ended up alone with no family, but then goes home to visit her mother), but it held its own. Perhaps the ironic thing is that the two leading actors were Heath Ledger and Vera Farmiga, who at the time no one had heard of, but now often draw people to the show.
Friday, June 17, 2011
Making a Fairy Part 1: The Wings
It has to be said that wings are the most important part of a fairy costume. The wings are what really prompt the fairy response. Working off the sketch I was given, I fashioned the wings in four sections out of electric cow fence wire (yeah, I know, me using anything other than bailing wire, what are the odds? But hey, fence wire is pretty close). Since it was to be a water fairy, I set out to find an apporpriate blue material to cover the wing frame with. I found this sheer blue material with a wavy pattern on it, which seemed to hit the mark because when I brought it home, my sister commented that the fabric looked like water. Perfect!
I cut the fabric to fit the wingshapes and sewed them to the frames by hand all the way around the edges. (That's the way I've always done it, but I've got to find an easier way, because this way just takes much too long). Then I wrapped a few paint stirring sticks with the elftover blue material and sewed them to all 4 sections to attached them to one another and provide stability.
Since the fairy dress will be white, the ties are white satin ribbon to go aroud the shoulders and tie in the back. There's also and option set of ribbons at the waist.

Wednesday, June 15, 2011
The Simple Pleasures Project
"An unhurried sense of time is in itself a form of wealth" ~ Bonnie Friedman
This year, the unthinkable happened; I missed the spring pumpkin planting. The planting of the pumpkins is one of my favorite parts of the farming year, something I always look forward to, something I'd be heartbroken to miss, and this year that is exactly what happened.
My hours at my office job had double this year, and it felt like I was racing all the time. I'd blow through chores in the morning as fast as I could, run off to work, then run home and try and get something done on the farm with the short time before nightfall, only to do the same thing all over again. I was feeling like I hit the ground running every morning, and I was missing out on the life I really loved, the life of the farm. It's difficult to enjoy working 40 hours a week at an indoor desk job, when your heart longs for the outdoor world of the farm. I was missing everything I loved and it made me feel like Geroge Baily "cooped up in some shabby little office." I knew I couldn't live like that, because what's the point of living if you're not enjoying life right? Something had to change.
I took a leap of faith, and knew I either had to get my hours at work lessened or go out on my own. I was prepared to do either, and it all worked out in the end. I got my office hours lessened, and now I get to enjoy that as well as enjoying my time on the farm. Now I actually feel like I have time to breathe, and it's made me realize just how much I really was missing. Too often we're so hurried in life that we don't have time to "stop and smell the roses," we neglect to notice the simple pleasures in life, and those simple pleasures are what really matter
So I've begun a little experiment I'm calling the Simple Pleaures Project, taking time to slow down enough each day to notice and enjoy something simple. 365 days of simple pleasures. I'm sure it's boring as all heck for anyone else to read, but it's something fun to do on your on own. Here's the link if you feel inspired to start your own such project for your life: The Simple Pleasures Project
Making an Elvin Archer Part 6: The Shirt
For shirt I used light green broadcloth, double-layered on the torso part, and single-layered on the sleeves. It's one of the Renaissance style, large shirts. I kept it fairly short so there wouldn't be a lot to stuff into the corset. The collar was a two inch wide piece of fabric that I did a running stitch on, and pulled it up tight, then I sewed it between the two layers of the shirt. To make the sleeves poofy, I cut them in a shape sort of like a half moon, and sewed the curved edge to the body of the shirt. The flat edges I made sure to cut on the bias so I wouldn't have to hem them. Then to enhance the "poof" I sewed some half-inch brown ribbon onto the sleeve-bottoms, sewing only at the very edges which left a tunnel in between. Through the tunnel, I ran a thinner piece of brown ribbon so the sleeves can be pulled up tight for added "poofyness" and a good fit on the arms. The olive green piece of cloth at the bottom is a sash/belt that goes around the waist.
The costume was finished off with a pair of latex elf ears.

The costume was finished off with a pair of latex elf ears.

Sunday, June 12, 2011
Making an Elvin Archer Part 5: The Shorts
To make the shorts, I took a pair of brown pants, kinda like sweatpants, but not quite so thick, and cut them off below the knee. Then I rolled the bottoms up a couple inches and sewed the roll in place. The pants had pockets in them, so instead of sewing them out, I left them in, figuring they might be convienent. And since the skirt will go over them, they won't show anyway. I cut the slits in the sides about an inch wide and sewed the seams wit keep them from unravelling. I didn't use metal lacing holes for these, I just did the whipstitch holes as I was afraid the metal might be uncomfortable on bare skin. The ribbon lacing is the same 1/4 inch thick satin brown I used for the the cloak closure. The waist is drawstring again, like the skirt, to ensure good fit.


Thursday, June 9, 2011
Making an Elvin Archer Part 4: The Skirt
For the skirt, I had enough faux suede left over from the cloak to make the skirt from that. This is probably the simplest part of the costume. I just cut the front section, and the back section (the longer part), sitched the two together at the sides, then cut the slits in both front and back. Because the faux suede frays easily, I zig-zag stiched all around the entire edge of each slit with my sewing machine to make sure it doesn't come unravelled. The waistband I made drawstring to be sure for a perfect fit.


Monday, June 6, 2011
Making an Elvin Archer Part 3: The Corset
Since this elvin archer is female, we needed a corset. I made this out of the same faux leather stuff as the bracers, but instead of putting fabric stiffener inside, I used two layers of denim. I had to give it a light "boning" without it being uncomfortable (battle elves needing to be able to move around quckly after all), so instead of metal or plastic boning, I lined the front of the corset with some vertical nylon strings. Actually, to be specific, the nylon strings are bailing twine (not just for use on haybails), to allow for plenty of flexibility, while still providing support. It's a front-lacing corset, so I used metal lacing holes on this, which I've done never before. Usually I just whipstitch around a cut to make a lacing hole, same as a button, but in this case, since it'd be seen from the front, I wanted it to look a bit fancier. I think I'll be using them for any corset I make from now on. They're not too difficult to work with and they look great!


Friday, June 3, 2011
Canandaigua Farmers Market
Market opens tomorrow and runs every Saturday, through the last week of October.
Canandaigua Farmers Market
Canandaigua Farmers Market
Thursday, June 2, 2011
Making an Elvin Archer Part 2: The Bracers
Here are the archer bracers. They look like leather, but they're not (I love animals, I rarely use real leather). It's actually a polyester fabric, that kinda squeaks like leather, sewn around a stiffener to give them the leather feel. These have laceholes and a buckle on each bracer. I found the metal part of the buckles in the pursemaking section of a craft shop. The straps I made from more of the fake leather.

Tuesday, May 31, 2011
Making an Elvin Archer Part 1: The Cloak
Got the elvin cloak done. It's a dark green suede-look cloth (100% polyester). I wanted to use alova (my favorite material of choice), but I couldn't find any in a dark green. This stuff looks just as good, but the edges on it fray, whereas alova doesn't, so I had to hem them all. I used brown satin ribbon for the tie-closure at the neck.


Thursday, May 26, 2011
Making an Elvin Archer
Got two Renaissance costume requests to work this week, an elvin archer and a water fairy. They sent me sketches of what they wanted them to look like, and now I get to bring them to life. It's gonna be fun as fairies and elves are some of my favorite costumes to make anyway. And even more fortunately, I've already got most of the material I'll be needing to make them. Some of it's left over from other costumes I've done, and some it came from Gramma cleaning out her old material and giving me what she didn't want to use.
First up, the elvin cloak.
First up, the elvin cloak.
Thursday, May 19, 2011
Turquois Feather Earrings
I still have some feathers left from a turkey I hit with my sister's car a few years ago (we ate it, it didn't go to waste). Mostly I've been making dreamcatchers out of the feathers, but some of the feathers are very small, so I decided to try a pair of feather earrings.
These are actually pretty simple to make. To begin you'll need two feathers. Take a quick walk through the woods or a chicken yard and you should find plenty of feathers lying on the ground. I used French hooks for the actual earring part, as they're the easiest to attach the feathers to, but you could probably use pretty much any type of earring top that has a loop on the bottom. You'll also need a few beads and maybe a piece of decorative metal.
I had an old necklace someone had thrown out made of turquoise beads and some kind of white shell bead, so I used those. And for the metal, I'd had some old jewelry scroll-work looking pieces, so I used one of those on each earring.
To put them together, you'll need some thin wire. I used copper, but any type of thin beading wire will do. Bend the wire in half and wrap it around the the quill of the feather. Wrap it several time to make it secure, then thread the two end of the wire through the metal piece and the beads. Twist firmly several times and trim the wire ends close to the twist. Use a pair of pliers to bend the tiny ends down into the beads they were just threaded through. This will keep the ends from poking into your ears.

How to make earrings out of feathers - video
Friday, May 13, 2011
Diesel fuel repels flies
Spring and summer bring lush foliage, blue skies, warm sunshine and long days of planting. With the arrival of the warm months, however, also comes the incessant torment of flies. Black flies, brown flies, horseflies, deer flies; all emerge at this time to wreak havoc on every farmer's animals.
The tags on a newly purchased cattle rub recommend citronella pyrethrum or any other similar insecticide insecticide, but flies will often inevitably still find their way through such defenses. However, although you won't find it listed on the tags of cattle rub, an almost infallible fly deterrent is ordinary diesel fuel. My grandfather has been using this method, which we refer to as a "folk remedy," for as long as I can remember with excellent results. In fact, we have found that nothing works better than diesel in preventing flies.
Diesel is a simple and effective means to repel flies and other insects that torment the animals of the farm. For those farmers who have a ready diesel supply to power tractors and tillers, it is also a convenient source of fly deterrent. Diesel works like any other fly repellent ; it is poured onto a cattle rub and left for the cows to cover themselves with. Its only drawback is the fact that if any is spilled on one's clothes while soaking the rub, they will forever smell of diesel. Therefore it is often best to set aside some clothes and reserve them only for the pouring of diesel.
Animals quickly learn that the smell of diesel translates to mean no flies. Every afternoon during the warm months, our cows can be found sitting around the rub, soaking up the sun with very few flies to bother them. The ground around the rub is constantly torn up; visual testament to the amount of time the cows spend there.
The smell of diesel is strong enough that it penetrates through the air creating a "fly free" zone all around the rub. At our home we apply diesel to a rub once a week and that seems to suffice. Reducing the amount of flies also reduces the spread of pink eye and other such ailments and succeeds in giving our cows a better quality of life.
Saturday, May 7, 2011
Wooly Bully, Wooly Bully, Wooly Bully
No, I'm not referring to the Sam the Sham and the Pharaohs song, I'm talking about my wooly little sheep Bullseye, whose nickname (well, one of his nicknames anyway, he's got about 4) is Bully. And yes, at this point he is very, very wooly. As such it's sheep shearing day, not one Ziah's (did I mention he has several nicknames?) favorite days, unless of course it's warm out and he's lying down. On days like that, he seems to enjoy it. Today was one of those days, and I've got him about 3 quarters sheared.
I have to do it when he's in a good mood because I don't do the whole wrestle-the-sheep-down-to-shear-it thing. I do it the old-fashioned way, I hand shear him with a regular set of shears, no electric razors here. That way I never have to worry about cutting him.
Between the wool I got last year, and the wool I'll have this year, there shoud be plenty make some nice balls of yarn. I've got my dyes all planned out, no synthetics here! They're going to be all veggie-dyes. I just need to find some carding combs and learn how to hand-spin it. That way, whatever I make with it, when I say handmade, I'll really mean 100% handmade. Hand-sheared, Hand-dyed, Hand-spun, Hand-knitted; just like being on an 1800's homestead.
If I'm really ambitious, I'll teach myself how to do some needle-felting. It looks pretty cool, but I can never find a felting needle anywhere. Guess I'll have to keep looking, and just stick with the knitting for now. (Unfortunately, when it comes to knitting I only know one stitch and can only knitt sqaures. If I have time, I'll teach myself to do mittens this winter; they always come in handy).
Sunday, May 1, 2011
You Might Be A Redneck
If your car looks like this, you might be a redneck...
 ...Hey wait, that's my car!
No, those aren't racing stripes, that's duct tape I had to put on it to hold down the hood when it was on it's last legs. It had been a good car, but needless to say, this thing didn't pass inspection when the time came and I had to get rid of it.
...but I'd say I made out pretty well on the replacement:

My Sunfire. I love this thing!
Sunday, March 27, 2011
Paper Spinners
These whimsical little baubles are quick and easy to make from scrap booking paper.
Supplies needed:
Scrap booking paper
Scissors
Sewing machine or needle and thread
To begin, cut a piece of 12×12 scrap booking paper into nine equal square sections. Set aside the ninth piece. Stack eight of the pieces back to back (i.e. printed side facing printed side, white side facing white side). Sew a seam right down the center of the stack of eight squares. Tie off the thread ends.
Take the ninth piece and cut it into the shape you want your spinner to be. Lay this piece on top of the stack of eight to use a guide. Cut the stack of eight into the decided shape, being careful not to cut the thread. Set aside the ninth piece again; you won’t be using it any more. Pick up the stack of eight and carefully fan out the edges. Fan only in pairs keeping the white side hidden, while allowing the pretty scrapbook paper to show through.
Run a length of string through the top of each ornament. Hang several together and watch them spin in the breeze. These look great as a garland at summer parties or on a tree at Christmas time.
![]()
Supplies needed:
Scrap booking paper
Scissors
Sewing machine or needle and thread
To begin, cut a piece of 12×12 scrap booking paper into nine equal square sections. Set aside the ninth piece. Stack eight of the pieces back to back (i.e. printed side facing printed side, white side facing white side). Sew a seam right down the center of the stack of eight squares. Tie off the thread ends.
Take the ninth piece and cut it into the shape you want your spinner to be. Lay this piece on top of the stack of eight to use a guide. Cut the stack of eight into the decided shape, being careful not to cut the thread. Set aside the ninth piece again; you won’t be using it any more. Pick up the stack of eight and carefully fan out the edges. Fan only in pairs keeping the white side hidden, while allowing the pretty scrapbook paper to show through.
Run a length of string through the top of each ornament. Hang several together and watch them spin in the breeze. These look great as a garland at summer parties or on a tree at Christmas time.

Tuesday, March 22, 2011
Little Baby Brock-Brocks
I had to stop at TSC to pick up some fencing today, and I was pleasantly surprised to find that they had newly hatched chickens out (or the "Little Baby Brock-Brocks" as I used to call them). There were also some little baby ducklings. They were all so cute and fluffy, I was thinking to myself, where's a camera when I need one! Well, not this year, but some year I'll bring home some of those darling little chickens and start my own flock, and hopefully be able to sell fresh eggs on the stand. All I need to do now is finish that solar powered cooler project I've been working on to keep the eggs cold at a farmers' market...
Tuesday, March 15, 2011
Sherbet Tie-dye
I'm not sure what the technical name for this sort of tie-dye is, but I call it sherbet tie-dye due to the fact that it's part white, part colored, kinda like sherbet ice-cream. This is one of the simplest tie-dye methods to use.
You will need:
White shirts
Colored dye
Rubber bands
Rubber gloves
Start by wetting down a white shirt (this project can also be done with a black shirt for a striking effect). Wring it out to remove excess water, and lay the shirt out flat on a table. Grabbing the very middle of the shirt, begin to twist it in a clockwise direction. Continue twisting until the entire shirt is tightly wound up into the spiral. Secure it with rubber bands.
Next drop the twisted shirt into a vat of dye, and quickly pull it out. (You may want to use gloves for this part to prevent your hands from getting all dye). Without squeezing the shirt and without removing the rubberbands, set the shirt aside to dry.
When the shirt has completely dried, remove the rubberbands and untwist the shirt. You should now have a colored spiral pattern on the white shirt. Wash the shirt on its own the first time to remove any excess dye. After that, the shirt can be washed normally with the rest of the colored clothes.
![]()
You will need:
White shirts
Colored dye
Rubber bands
Rubber gloves
Start by wetting down a white shirt (this project can also be done with a black shirt for a striking effect). Wring it out to remove excess water, and lay the shirt out flat on a table. Grabbing the very middle of the shirt, begin to twist it in a clockwise direction. Continue twisting until the entire shirt is tightly wound up into the spiral. Secure it with rubber bands.
Next drop the twisted shirt into a vat of dye, and quickly pull it out. (You may want to use gloves for this part to prevent your hands from getting all dye). Without squeezing the shirt and without removing the rubberbands, set the shirt aside to dry.
When the shirt has completely dried, remove the rubberbands and untwist the shirt. You should now have a colored spiral pattern on the white shirt. Wash the shirt on its own the first time to remove any excess dye. After that, the shirt can be washed normally with the rest of the colored clothes.

Wednesday, March 9, 2011
Rub-on Transfer Garden Wagon
Rub-on transfers can give new life to old wood. They look hand-painted, but are so much simpler.
I had one of those little wooden garden wagons lying around in storage. It was weathered and beat up, not much to look at, so I decided to try a little experiment. The materials required for this project are pretty simple:


Something to paint (in this case I used a wooden garden wagon, but the rub on transfers will work of most surfaces)
Spray paint of your chosen color
Rub-on transfers
Popsickle stick
Spray varnish.
To begin this project, spray your entire item with two coats of paint. You can also paint it with a brush, but the spray paint is much faster, espcially on wood. Let dry overnight.


To use the rub-on transfers (these can be found in almost any craft store, I got mine at Joann Fabrics), cut around the shape you want to rub. It's ok if you have white around the image because most rub-on transfers don't transfer the white part. Lay your transfer picture-side down on your item and use the popsickle still to rub the back of the transfer. Use a circular motion and rub the entire transfer. You'll be able to see through the backside when the transfer leaves the backing paper. Carefully pull off the backing paper.

Continue this process using as many rub on transfers as you need to complete your project. When finished, coat the entire project with a layer of spray varnish. This will help prevent the transfers from getting scratched off. If you plan to you item an an outdoor decoration, the varnish is especially important.

Friday, March 4, 2011
thewoodlandelf.com
Fruition. It is a word that describes what happens when you plant a seed and carefully tend it until it last it bears fruit and all the hard effort of your labor are rewarded. At long last, I have reached fruition with my website. I had a simple one for several years and never really liked it, but never had the time to finish it. It was always been on the back burner, I only worked on revamping it when I had spare bits of time, when I wasn't working on sites for other people. Well, it's finally done! Now I can breath a sigh of relief.
I think I finally have it the way I like it (at least until tomorrow when I decide something's not quite right). Building it was the easy part, it was writing copy that I didn't hate that took up most of my time. I finally elected to write everything in 1st person because droning on about yourself in the 3rd person is just too creepy. I tried to keep it lighthearted and down to earth...I'm a country girl, after all.
Check out the new design at www.thewoodlandelf.com
Monday, February 28, 2011
Heroes
My family usually has the television on the night of the Oscars, and we watch in between doing whatever work we're doing that particular evening. I'm kind of the geek of the group though. While most people are waiting for the best actor/actress/picture/director awards, I'm eagerly awaiting the announcement of the costume design award which usually goes to someone only I've heard of. Reason being of course, that I make costumes, so I actually care about the people nominated, whereas the rest of my family is just waiting for it to move on.
While I was personally rooting for Sandy Powell, one of my costume design heroes (she was up for the Tempest), the award actually went to Colleen Atwood for Alice in Wonderland. While I was disappointed that Powell didn't take it, Atwood is still in my top 5 favorite costume designers.
As far as my favorite costume design heroes, my #1 spot is a tie between Sandy Powell who gets a large percentage of the good ones (Rob Roy, Young Victoria, Gangs of New York) and Ngila Dickson who did my all time favorite movie Lord of the Rings, not to mention The Last Samurai, the Illusionist (which I never saw, but the costumes were nice), and was one of the designers for Xena: Warrior Princess.
Then the #2 spot goes Jenny Beavan (Everafter, need I say more?). And at #3 comes tonight's winner Colleen Atwood (She did the costumes for Memoirs of a Geisha, and while I never saw the film, I studied the costumes like there was no tomorrow). So there we are. Four costume designers who greatly inspire me and keep me working hard on my own costumes.
As far as the Academy Awards themselves, I just have one question, how come nobody ever shows up in a gown or a tux they got at the Goodwill?
Friday, February 25, 2011
Winter Harvest
I made it up to the beeyard today. In all honesty, I'm not sure you can really call it a beeyard, it's more like a "beewood," as I keep my box up up in the forest, so the bees don't bother my cows and horses (or us for that matter). But it is a "Bebox Approved" beebox. (Long story, but my younger brother once made this creepy little doll thing that he named Bebox, so ever since then, we've said my beebox is "Bebox Approved")
Anyway, I got my wax harvest in today. I still haven't gotten any honey out my hive in all the years I've had it because the bees usually have it pulled down by the time I get around to harvesting. I know you're supposed to harvest it in the spring and the fall, but I always wait until winter, because I have more time to do the harvesting. Besides, I figure if the bees have taken it, they probably needed it, and if I leave them their honey, at least I don't have to feed them through the winter. It's unconventional, but it seems to be working out pretty well, as my bees have survived several frigid winters when a lot of the hives in the area died. (One year, they even survived an ice-cold winter after someone had knocked the top of the hive off!)
In any event, I have wax, so it's time to dip some candles!
Sunday, February 20, 2011
Wheat Weaving: Dreamcatcher
Traditional wheat weavings designs had many meanings in ancient times. Some were used as courting favors, some were meant to bring luck, and many were used to ensure a bountiful harvest in the next year. Traditional designs abound in plenty, but even with the multitude of classic wheat weaving designs, it's still fun create one's own patterns. I created this dreamcatcher to blend the Celtic tradition of wheat weaving with the Native American tradition of dreamcatchers.
Begin by soaking a few dozen wheat or rye straws without heads.
Take a length of bailing wire (or a wire of similar thickness) and bend it in a circle. Cut it to your desired dreamcatcher size. Unbend the wire and slip a piece of straw over the wire, add a second if needed, until the wire is completely covered. Tie five long straws to one end of the straw-covered wire, bend them out at an angle, so that one straw points north, east, west, and two straws point south. Take the left-hand south straw and bend it over the right-hand south straw so that it lies flat next to the straw pointed east. Then take the original east straw and bend it over the new east straw so that it lies flat next to the north east straw. Continue on in this manner, with the left-hand straw always bending out the right-hand straw (rotate the weaving so the straws you're bending are always south if it makes it easier). When one straw gets short, just put another in its place.


The feathers are each made by braiding 7 straws together, then slowly cutting them off one at a time, so that the ends taper away. Twist the remaining two ends around each other and tie each feather to the dreamcatcher. It's a bit harder to make than a traditional dreamcatcher, but I'm sure it keeps nightmares away just the same.

Tuesday, February 15, 2011
Churning Butter
It was a butter day today (yes, at my house we still actually churn our own butter). My cousin has a dairy farm where he sells raw milk, so every few weeks someone in the family makes a milk run to his farm. We end up with four one-gallon jars of milk, each with a 1-2 inch layer of cream on top, which of course becomes the butter.
There are several different ways to churn butter. There is the old churn and dasher method, but few people have enough cream to fill one of these. There is the butter bowl method which involves stirring the cream in a large wooden bowl until it becomes butter. And then there are the shaker jar and the paddle jar methods. These two are probably the most convenient.
If you only have a relatively little bit of cream, the shaker jar method works well. Simply fill a canning jar with the cream, screw on the top and shake the jar until the cream turns to butter. The drawback of this method is that your arms generally feel like they're going to fall off from exhaustion long before the butter begins to form.
The paddle jar is a much easier method. The paddle jar is basically a glass jar with a set of paddles that churn the butter as you turn the handle. The one we use belonged to my great-grandmother, so it's probably over a hundred years old, but it still works great. However, since the majority of people probably don't have their great-grandmother's churn hanging around the house, there are several companies that still make jar churns. A quick Internet search can locate them.
To churn butter, leave jars of milk in the refrigerator over night. This will allow the milk to settle, so all the cream is easily accessed at the top of the jar. Use a measuring cup to dip the layer of cream off the top of the milk and put it in the churn.
Begin to churn the cream, moving the paddles at a relaxed rate. You'll be there a while so don't wear yourself out by trying to go too fast. (If using the shaker jar method, just shake as hard you can for as long you can, then pass the jar to a friend and have them do the same).
The cream will go through several stages. First it will slosh up and down on the sides of the jar like milk. Second the top of the cream will start to bubble and suds-up. Then the bubbles will subside and the cream will become smooth again, but as it sloshes against the side, it won't slide away cleanly; it will begin sticking to the jar. When this happens the cream is beginning to "butterize."
Keep churning, stopping periodically to check the cream inside. When you see thick clumps form, you can celebrate. Spoon out of the clumps of butter into a bowl, and save the leftover liquid for any recipe calling for buttermilk. The butter is best best kept in the refrigerator until you are ready to use it as it will go bad faster than store-bought butter, due to not having the preservatives.
Once in a while, for some reason still unknown to mankind, the cream will refuse to turn to clumps of butter. It will instead form a light and fluffy layer of whipped butter. Don't despair. Although it may not be traditional butter, that fluffy stuff is the sweetest tasting butter you will ever have.
 |
| Cream ready for churning. |
Subscribe to:
Posts (Atom)